Drywall Repair and Painting Services in Everett, WA
The Plaster Wall That Seven Contractors Refused to Touch
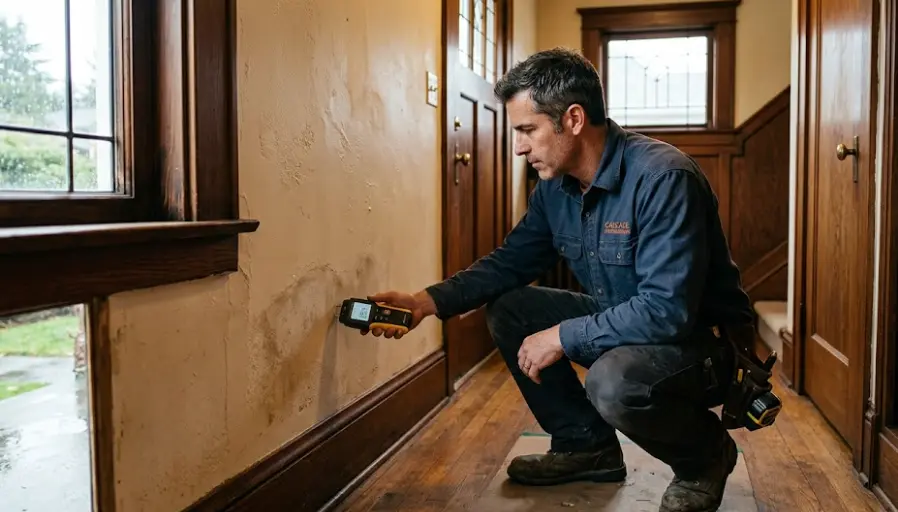
Ray had lived in his 1931 craftsman on Colby Avenue for thirty-two years. When he finally noticed the damp smell coming from the hallway wall, a slow leak behind the bathroom had been working on it for the better part of three years. Three inches of original horsehair plaster, soaked through, crumbling from the inside.
Six contractors looked at it and walked. The seventh quoted him $11,000 to gut the hallway and replace everything with new drywall. "It won't match," the guy told him. "Old houses never match."
When Ray called me, I spent forty minutes just doing an assessment — checking which sections were structurally sound, mapping where the lath underneath was still good, testing moisture levels. Then I told him the real number: $2,400. Not because I was cutting corners. Because I actually know how to repair plaster. After fifteen years working in Everett, I had to learn. About a third of the homes in this city still have it.
Everett is Not Sammamish. It's Not Bellevue. The Walls Are Different.
What Makes Everett Walls Hard:
- Plaster in pre-1950s homes: Completely different repair chemistry than drywall
- Moisture from Puget Sound: Marine climate accelerates every failure point
- Nail pop epidemic in 70s/80s stock: Silver Lake, SE Everett tract homes all have it
- Hidden water damage: Aging roofs and old cast-iron pipes hide leaks for years
What I Bring to Everett Jobs:
- Plaster repair certification: Three-coat lime plaster, veneer plaster, gypsum hybridization
- Marine-grade moisture barriers: For walls within a mile of the Sound
- Systematic nail pop protocol: Fix the structural cause, not just the bump
- Hidden damage assessment: Moisture meters, not just visual inspection
Three Problems That Keep Repeating Themselves in Everett Homes
I've done over three hundred repair jobs in Everett since 2009. There are problems I see everywhere else — and problems that are specific to this city. Here are the three patterns that account for probably sixty percent of my Everett calls:
Original plaster walls expand and contract at a different rate than joint compound. When contractors patch plaster with standard drywall mud, it looks fine for six to eighteen months — then cracks right along the repair edge every single time. I've seen this repeated three and four times on the same wall by three different contractors who didn't understand why it kept failing.
The fix is either true lime plaster repair (matching what's already there) or a hybrid approach using a bonding agent and setting-type compound, never pre-mixed. Takes longer. Costs more in materials. Doesn't come back.
The 1970s and 1980s ranchers in Silver Lake, Henderson, and southeast Everett were built fast. The vapor barriers were either minimal or installed wrong. Forty years of Puget Sound humidity working on inadequate vapor control means these walls absorb moisture seasonally — and the drywall screws and nails work their way out every fall when things get wet, back in every summer when they dry.
I've seen houses where the previous owner "fixed" nail pops three times and they came back every winter like clockwork. The real repair is setting the fastener properly, countersinking it, and then blocking the moisture pathway — not just filling the bump.
Older Everett homes — anything built before 1970 — tend to have aging roofs, old cast-iron supply lines, and galvanized drain pipes that corrode from the inside out. The leaks they create are slow, often invisible for a year or more. By the time you smell something or notice a stain, the damage behind the wall is usually much larger than what's visible.
I use a moisture meter on every assessment. Not to upsell — to avoid doing a repair that will fail in eight months because there's still moisture in the wall cavity. Had a call two years ago from a homeowner furious that his "repaired" wall was bubbling again. The previous contractor patched it without checking moisture levels. There was still an active drip from a corroded elbow joint eighteen inches up.
Everett Housing by Era
-
Pre-1950
Plaster walls, lath construction, North Everett / Colby area
-
1950s–1960s
Early drywall (thinner, softer), downtown adjacent neighborhoods
-
1970s–1980s
Tract ranchers, nail pop epidemic, Silver Lake / SE Everett
-
1990s–2000s
Standard construction, Cascade / Mukilteo corridor
-
2010+
Modern builds, Port Gardner renovations, waterfront condos
My Track Record:
- • 300+ Everett repairs completed
- • All wall types: plaster to modern drywall
- • 5-year warranty on all work
- • Same-day emergency response
Neighborhood by Neighborhood: What I Know About Everett Walls
North Everett / Colby Avenue
Era: 1910–1950. Craftsman bungalows, foursquares, early Colonials.
Wall type: Three-coat horsehair plaster over wood lath in older buildings; some early drywall in additions and renovations.
What I See Here:
Cracked plaster from foundation settling. Failed drywall patches where previous work met original plaster. Water intrusion through deteriorated window glazing. The homes are beautiful — and they reward proper repair with results that last decades.
My North Everett Approach:
- Plaster bonding agent before any compound work
- Setting compound only — no pre-mixed on plaster
- Sand-float or smooth finish matched to original
- Oil-based primer on all plaster repairs before painting
Silver Lake / SE Everett
Era: 1970–1990. Ranch homes, split-levels, early two-stories.
Wall type: Standard drywall, often 3/8" in non-load-bearing walls (undersized by today's standard).
What I See Here:
Nail pop clusters in bedrooms and hallways. Tape separation at ceiling lines from seasonal wood movement. Poorly executed original drywall finishing (builder-grade finish that barely passes Level 3). Homes here are priced for value — and good repair work adds real equity.
My Silver Lake Approach:
- Systematic nail pop survey before pricing
- Replace loose fasteners, don't just fill
- Tape separation: full re-tape, not skim coat
- Moisture-resistant primer as standard
Port Gardner / Waterfront District
Era: Mixed. Original 1890s–1920s commercial/residential plus recent renovation projects.
Wall type: Anything from original timber-frame plaster to brand new 5/8" type X drywall.
What I See Here:
Everett's waterfront renovation scene has been active for a decade. Older buildings being converted to lofts and condos. Exposed brick walls that homeowners want to integrate with new drywall. High humidity from Puget Sound proximity — within two blocks of the water, I treat everything like a marine environment.
My Waterfront Protocol:
- Salt-air resistant primer and topcoat
- Vapor barrier behind all exterior-adjacent walls
- Moisture readings before and after repair
- Brick/drywall interface sealed with elastomeric caulk
Cascade / East Everett / Mukilteo Blvd
Era: 1990–2010. Planned subdivisions, two-stories, some townhomes.
Wall type: Standard 1/2" drywall, mostly consistent Level 4-5 finish.
What I See Here:
Settling cracks in corners and at window openings — these houses were built fast during the boom years and the framing sometimes shrinks unevenly. Drywall seam failures in vaulted ceiling areas where the roof rafter movement transmits into the ceiling board. Generally easier to work with than older neighborhoods, but precision matters at Level 5 finish quality.
My East Everett Approach:
- Corner crack: V-groove, not just fill
- Vaulted ceiling seam: fiberglass mesh + hot mud
- Skim coat to Level 5 when matching surrounding finish
- Flash-coat priming to reveal texture before final paint
What Repairs Actually Cost in Everett — Real Numbers
Pricing is a sensitive subject, and I'll be direct about it. Everett is not Sammamish — I don't charge luxury-home premiums here, and I won't. But I also don't race to the bottom, because the cheapest bid almost always means coming back in eighteen months to fix the fix.
On Plaster vs. Drywall Pricing
Plaster repair runs 40-60% more than equivalent drywall work. The materials cost more, the technique is slower, and the failure penalty for rushing is high. Anyone quoting the same price for plaster as drywall either doesn't understand the difference or is planning to use the wrong approach.
| Repair Type | Typical Scope | Everett Price Range | Time |
|---|---|---|---|
| Nail Pop Repair | Per-room sweep (avg 15-25 pops) | $180 – $320 | Half day |
| Small Hole / Ding | Up to 4" drywall | $150 – $220 | Same day |
| Hairline / Corner Crack | Drywall, up to 24" linear | $200 – $380 | 1–2 days |
| Plaster Crack Repair | Same scope, plaster walls | $320 – $580 | 2–3 days |
| Water Damage Patch | Up to 2 sq ft drywall | $350 – $550 | 2 days |
| Large Damage Area | 2–10 sq ft, drywall | $480 – $850 | 2–4 days |
| Plaster Section Replacement | Up to 10 sq ft | $750 – $1,400 | 3–5 days |
| Full Room Skim Coat | Complete refinish | $1,100 – $2,200 | 4–6 days |
All prices include labor, materials, texture matching, and painting to blend with surrounding wall. Plaster work requires additional cure time between coats — that's why timelines are longer, not because I'm slow.
Always Included
- On-site moisture assessment
- Correct material selection for wall type
- Texture matching to existing finish
- Paint blending beyond repair area
- Full cleanup, no debris left
- 5-year warranty
Not Included:
- Plumbing or roof repairs (source issues)
- Mold remediation over 10 sq ft
- Full room painting (quoted separately)
How I Actually Do the Work — The 6-Stage Process
This isn't a marketing list. It's the actual sequence I follow on every job, and the reason each step exists.
Diagnosis — Wall Type, Moisture, Cause
Before I touch anything, I identify what the wall is made of, read moisture levels with a meter, and determine the underlying cause. A repair that ignores root cause will fail. This step often takes longer than clients expect, but it's what separates work that lasts from work that comes back.
Material Selection for This Specific Wall
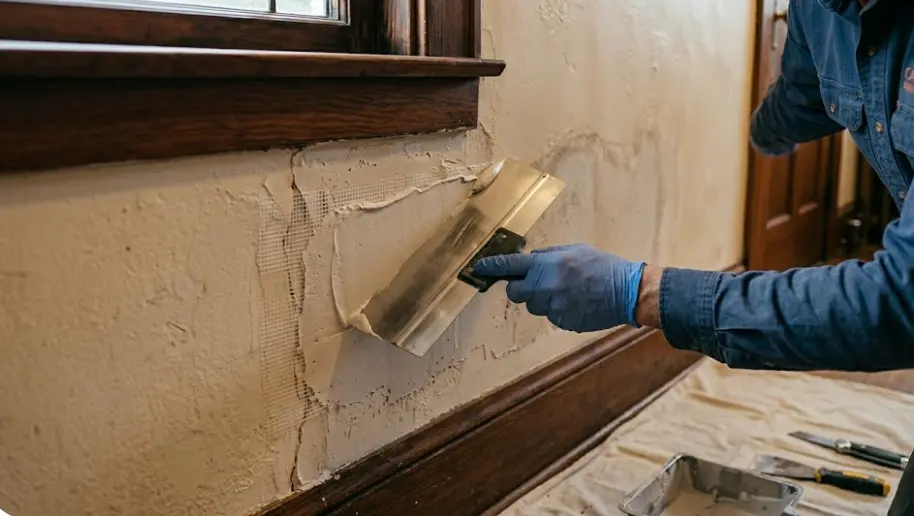
I bring multiple compound types to every Everett job because I never know what I'm walking into. Setting compounds for plaster work, lightweight compounds for finish coats on modern drywall, moisture-resistant variants for bathrooms and exterior walls. Using the wrong material on plaster is the single most common failure I see from other contractors.
Structural Prep — Don't Just Fill the Hole
Holes get backing. Cracks get V-grooved or routed out before filling — never just spackled over. Nail pops get the fastener removed or set properly before the dimple is filled. Plaster repairs get bonding agent applied and allowed to tack before any compound. The prep is slow and it's where amateurs cut corners.
Layered Build-Up With Full Curing Between Coats
No filling a crack in one thick coat. I build in three or four thin layers, letting each cure fully. In Puget Sound humidity this matters even more — thick wet coats trap moisture and shrink-crack. Yes, it takes an extra day. That's why my work doesn't come back.
Texture Matching
Everett homes have a wide range of textures — from the sand-float of 1930s plaster to the orange-peel spray of 1980s tract homes to the smooth Level 5 in modern builds. I match what's on the wall, not what's easiest for me to do. I carry a texture gun and multiple nozzles, and I practice the match on scrap before touching the wall.
Prime, Paint, and Blend Beyond the Edge
Raw compound is porous and absorbs paint differently than the surrounding wall — you always prime before topcoat, full stop. Then the topcoat blends out eight to twelve inches beyond the repair edge, feathered to invisible. The goal is that you should have to think hard to remember where the damage was.
Typical Project Timelines
1–2
Days, nail pops + small holes3–4
Days, plaster crack repair5–7
Days, plaster section replacement5yr
Warranty on all work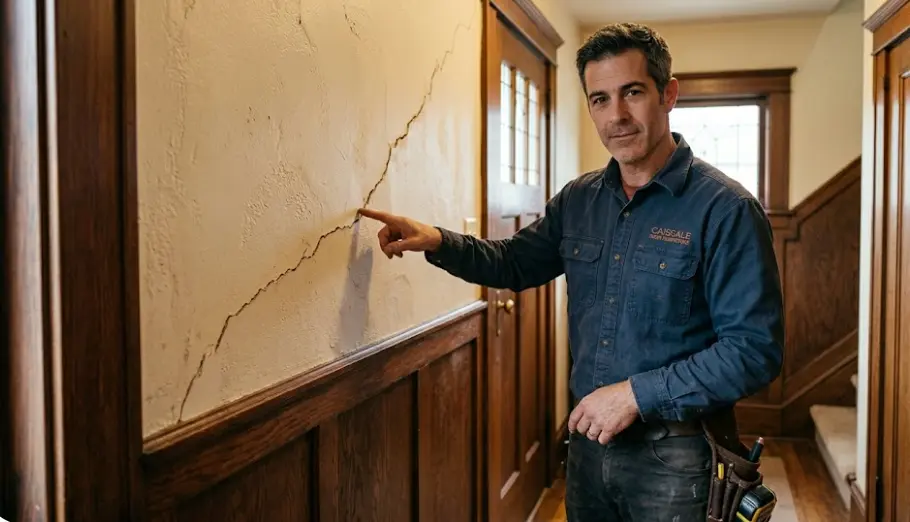
Three Jobs That Stayed With Me
"The Navy Family Who Had 72 Hours"
"We got PCS orders on a Thursday. Had to list the house by Monday. There were three holes in the walls from where we'd taken down a TV mount and a shelving system, plus a crack above the garage door that had been there since we moved in. Antonio was here Friday morning and done by Saturday afternoon. The house sold in four days."
"Seven Contractors, Seven Failures, One Fix"
"We had a crack in the dining room plaster that everyone kept filling with drywall compound. Always came back. Antonio explained the chemistry problem in about two minutes, used a completely different approach, and it's been three years now. Nothing. I wish I'd called him first."
"Caught the Mold Before It Spread"
"Antonio found moisture in the wall during his estimate — I thought it was just cosmetic damage from an old stain. He told me to get a plumber to check first. The plumber found a slow leak that had been going for two years. Saved us from what could have been a full mold remediation. Then he did the wall repair after everything was dry. Couldn't be happier."
Warning Signs to Know — Especially in Older Homes
Cracks That Return After Repair
If a crack has been filled more than once and keeps coming back, the filling material is wrong for the wall type, or there's an active structural or moisture cause that hasn't been addressed. Stop filling it and call for a proper diagnosis.
Brown or Yellow Staining — Even Old Stains
Old water stains bleed through paint. New stains indicate active moisture. Either way, painting over it without a stain-blocking primer and moisture assessment will result in the stain reappearing within weeks.
Multiple Nail Pops Appearing at the Same Time
One nail pop is normal. Five or ten appearing in the same area over one season is a sign of seasonal moisture movement or framing shrinkage. In Silver Lake homes especially, this is a whole-room problem, not individual spots.
Paint Peeling at Ceiling Line
Peeling where the wall meets the ceiling almost always means the tape at that joint is failing. This gets worse every year if not addressed and can require retaping the entire perimeter of the room. Caught early, it's a $200–300 repair. Left alone, it becomes a multi-day job.
Don't Wait — Call Now For:
- Active moisture / wet wall: Every day of delay is more damage
- Musty smell near wall: Possible hidden mold
- Pre-sale repair: Book early — I fill up fast before listing season
- PCS / military move: Same-week service when available
Response Promise:
For water-active damage, I aim to assess within 24 hours and can often start work the next day to prevent spread.
Walls That Don't Come Back. Work You Can Trust.
Whether it's a 1928 plaster wall in North Everett or a nail-pop problem in a Silver Lake ranch, I've seen it and fixed it. 300+ jobs in Everett. Real experience with every wall type this city has.
Serving all Everett neighborhoods: North Everett · Colby Ave · Silver Lake · Port Gardner · Cascade · South Everett · Mukilteo Blvd corridor
Questions I Get Asked Most Often in Everett
Yes, and they should be. Replacing original plaster with modern drywall removes a lot of the acoustic and thermal mass that makes older homes comfortable. Proper lime plaster repair, done with the right materials and technique, integrates with the existing wall and lasts as long as the original did — which, in North Everett homes, is sometimes eighty or ninety years.
The key is not using modern joint compound on historic plaster. Different material, different chemistry, different expansion rate. Match the repair to what's already there.
Most textures in Everett homes are either skip trowel, orange peel, or sand float — with variations in density and depth depending on the era. I can identify which pattern you have, usually within a few seconds of looking at it under raking light. Then I mix and test on a scrap board before touching your wall.
The matching isn't just the pattern — it's the depth, the paint sheen over it, and how it's been worn by time. Blending a fresh texture patch into a fifty-year-old wall takes technique that I've spent fifteen years developing.
Yes. I've worked with plenty of Navy families from NAS Everett over the years. PCS timelines are real, and I understand that "we need this done by Friday" isn't negotiable when orders come in. I'll be honest with you about what's achievable in your window and won't promise something I can't deliver. When the timeline is tight, I'll tell you exactly what can be done and what might need to wait.
For pre-inspection repairs, contact me as early as possible — I can often schedule within a day or two of a call.
Because compound has to cure between coats, and in Puget Sound humidity that takes longer than it does in a dry climate. Rushing it — applying the next coat before the previous one is dry — causes shrinkage cracking that shows through the paint and means doing the job over. I'd rather take an extra day than have you call me back in three months.
Simple repairs (one coat of compound, quick texture, touch-up paint) can be done same-day. Anything structural, anything plaster, anything involving multiple coats — plan for two to four days minimum for quality that holds.
I do it myself, always. The painting phase on a drywall repair isn't a separate trade — it's the final step of the same process, and whoever did the repair should do the painting. They know where the texture transitions are, how the compound absorbed the primer, and where to feather the blend. Handing that off to someone else breaks the chain of quality control that makes repairs invisible.
For full-room repaints or exterior work beyond the repair area, I can quote that separately as a combined project.